Showing posts with label master. Show all posts

Monday, November 5

Gallery Shelves

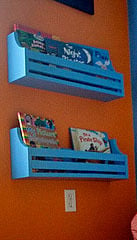
Our master bedroom has been a work in progress for what seems like FOREVER. It was re-painted well over a year ago, and every since, we've been slowly changing things out or updating them. The most recent addition has been some gallery shelves that W whipped up a few evenings ago. 

You can buy these from Pottery Barn for the hefty price of $55 but that would only get you one 4-foot ledge when I wanted two five-foot ones. Instead, we used Ana White's plans for these..she calls them the "$10 shelves" since that's how much the wood costs to make these. We just used pallet wood that we already had so they were free! Yay! Favorite price. They're basically just three pieces of wood nailed together. Super easy to make in a single night and very easily custom size-able.
So W built, I painted {high gloss white; 2 coats}, he hung, and I filled 'em with this and that from around the house/garage to have a look-see.

And so they sit above our yellow dresser,

where I can enjoy more memories from my bed! Yay for fewer blank walls!
Time for some more gushy, lovey dovey, romantic prints and pictures, no?!?!

Tuesday, June 7

Our New Headboard

We are in headboard business! Here's our new DIY headboard:
Although, it's not our DIY. One of my go-to girlfriends for DIY advice and inspiration, Jill, and her Will made this. Not too log ago, they moved into a new house and their master situation no longer fits the headboard. She knew about our future plans to make one {after all, she started the whole thing by sending me some tutorial links} and was so thoughtful to see if we wanted theirs! 

I love the blue fabric from her last upholstery job, but I still may hunt down some yellow. I'm totally loving the fact that we finally have something behind our bed besides the vast amount of wall space!!

I may still have W add some curves on to this, but I'm not in any rush. Here was my ultimate inspiration for the shape:
But now I'm thinking the current shape works much better if I want to hang a few prints above the bed. He may have just gotten out of a DIY project. ;)

We've also gone WHITE with our duvet cover several weeks ago. It's the first time I've ever done white {because, let's face it, I can't wear white without getting something on in within the first 5 minutes} and I was really hesitant. But I'm totally loving it: so crisp, clean, light and airy! A real difference from the rich chocolate brown duvet I switched it out with. I'm just praying we get through this newborn stage with less dry cleaning runs than last time!!
I still need to make some new Euro sham covers {could you tell in the pictures that there are none?}, new throw covers, update those side lamps with a fresh coat of spray paint, add some curtains {?} and accessorize. I'm love to replace our end tables too, but that ain't happening unless we find something cheap! Maybe time for more garage sale hunting??

Wednesday, May 25

Dresser Reveal {Not Your Grandma's Dresser}

 What we thought would be a bear of a project turned out to be fun! We were going to leave this as the very last thing to do, but when some friends volunteered to helped, we jumped at the chance after E's bookcase.

Here's the before:
This piece was my grandparents. It's in really good shape--we were the ones to put all the scratches and scraps in it. My grandma told me they bought it at an estate sale in 1973 while they were living in Kansas. It was part of a multi-piece set and survived many moves. She grumpily gasped a little when I told her we were paining it yellow. The cherry finish is really nice, just not my style. She relaxed a bit when I said our new color scheme for the master is yellow and gray-- she had a lot of yellow in her house...classy lady, that one!!

And our after:
Now, my favorite piece of furniture we have!

Easter weekend, W was able to get some friends over to help with the hardest part: sanding down the dark finish. What would have taken him several evening hours, ended after 3 hours. It's amazing how far a bribery of beer and fresh deli sandwiches can get ya!

 The dresser: post-sanding
The guys were so quick that we had to call it a day because I hadn't even purchased the paint yet. So we had to let the dresser hang out in the garage. With our entire contents just hanging out in our room. Just lovely.
{This picture is giving my dad a heart-attack right about now.}

I'll spare you the pictures of what it all looked like post-vacation, a few weeks later. Not pretty. E started jumping on our piles like he does when I'm putting the laundry anyway. I knew it was time to get back to working on this sucker when we started collecting baskets of clean clothes on the floor too-- reminds me of my disastrous room in high school...eh. moving on...

After I finally committed to a color, it was back to the rollers again to prime.


Some light sanding and two coats of Behr's Citrus Zest later and we were in dresser business!!

After doing a bit of knob hunting, I realized that I didn't want to pay $5-10 dollars for just one knob when we needed 8. So with a bit of high-gloss white spray paint, we got some updated knob-age. This was my first time using spray paint and let me tell you, I'm hooked. Not so much on the fumes, but on the instant updated look! They were brass before, but looked porcelain/ceramic after a coat of white. Here was my take...
Then W stepped in with this contraption he made...
Seriously, this guy is the quintessential problem solver! Love him!

Well, she's a real beaut in her home. And will be a dandy, {temporary} changing table in a few months when Boy hangs out in our room before moving to his own. Thank goodness for protective coating and chux pads!

Break Down:
Roller, Tray & Brush Set: $11
Quart of paint: $12
Polyurethane Protective Coat: $14
White spray paint: $3
Sandwiches & Beer: $15
Total: $55...but $30 for us with a gift card!

Think Grandma will approve?!?

Thursday, April 7

List of Future Projects

W may or may not now call me a DIYN..."do it yourself nutter." I can definitely see how this can be quite addicting. ;) Ever since finding Ana White's free plans, I'm a bookmarking mad-lady. I'm thinking we could shoot for a big project per month and still get some things done before this baby BOY joins us. EEK! :)

I was talking to my mom about this recently. In all seriousness, I haven't really cared all that much about what went into our house, until now, as along as it was warm, welcoming, and tidy for guests.. I mean, we were really fortunate that so many lovely pieces came from my grandma and parents during their respected moves {assisted living and the re-modeled grandparents' house} to decorate our house, but I didn't really know what I was doing or what my style was. My mom made a good point that now that I'm spending much more of my time at home, I care more about adding more personal touches to it. Now, if only I could harness that motivation for clean, clean, cleaning...oi!

Anyway, here's what DIY projects I've got on my list so far {not counting painting our & E's room}...

1) Definitely the next project, especially since we can re-use most supplies from E's bed project.

We'll pass on the legs and lay it horizontally instead against the window for a window seat/reading area. I'll make a seat cushion, throw pillows and buy some baskets for storage.

2) A friend just re-did a piece of furniture using this amazingly awesome color. I'm hooked and want to update our dresser with it now....in Behr's Lemon Lime
Her beauty--

Our potential--


3) Bookshelves
It's a toss up between these and another style that I've been eyeing for E's big boy room.

4) Update table lamps with spray paint & fabric
I don't know if I could get away with this much girlie-ness but this is my inspiration
It may end up looking similar to this, just different colors/fabric

5) New headboard: I've been talking about wanting a new bed for like 3 years now. I found this great tute on making your own headboard and thought it was a decent start and much more manageable on the budget.
 But, potentially with this fabric...to go with the whole yellow and charcoal theme I'm leaning towards for our master. W thinks this has too much potential for getting dirty, but it's SO cute!

 ... And way down the road when I start thinking about our downstairs...

or
I have to perfect spot for this or this and would really love some hidden storage for E's toys.

...I wonder if they have an DIYA {do it yourself anonymous} group?!...Heh.